I’ve been exploring using Headscale to build my own VPN service.
Overview
There is a misconception that using a VPN will hide your activity on the Internet. Whilst this is partially true, the concern is around what information the VPN provider is collecting and how they might be storing/using that information.
It’s simple enough to purchase a virtual private server from somewhere and run OpenVPN or Wireguard to host a single VPN server. But what if you wanted to mimic the ease of use that purchasing a third-party VPN provides? What if you wanted to be able to exit in many different countries around the world?
Tailscale is an interesting product that provides a key management layer to Wireguard along with some NAT traversal to allow hosts behind CGNAT or other firewall restrictions to connect to one another. The control component is closed-source and while it has a free tier, you’re still placing trust in a third party. The client component on the other hand is open source. Enter Headscale, an open source project to mimic the functionality of Tailscale server component.
One of the features of Tailscale is to allow a node on a Tailnet to advertise as an exit point. Nodes can advertise routes and access control policies can restrict which nodes can access what resources. Let’s try and advertise a default route 0.0.0.0/0 with an allow all policy.
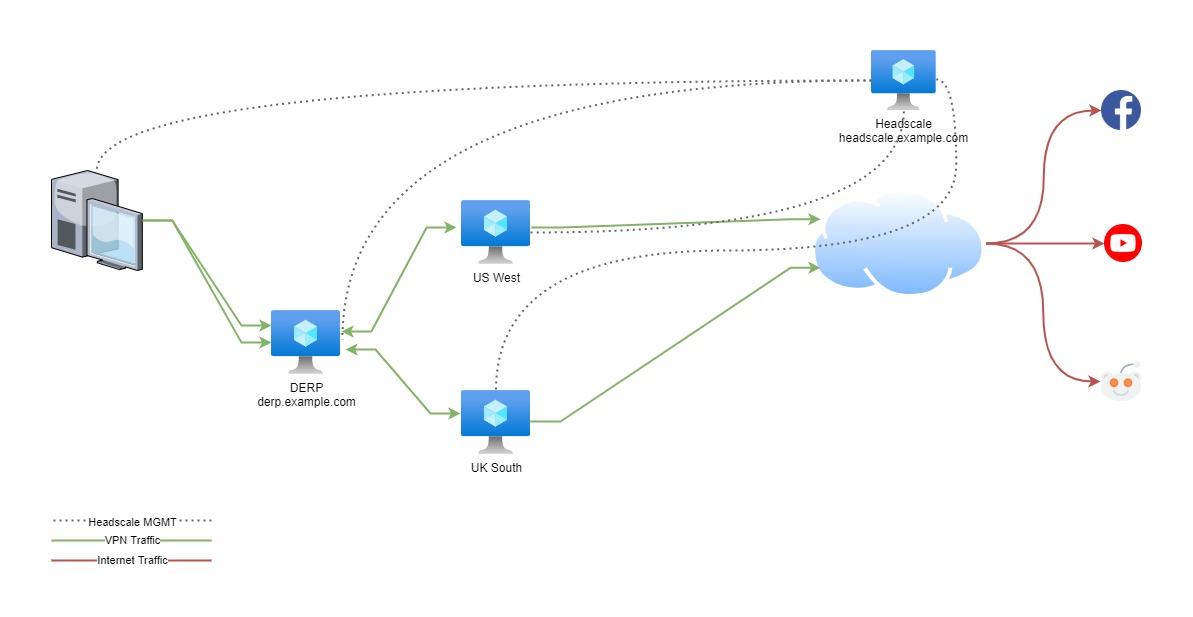
Architecture
We’ll need the following components:
- Headscale server
- DERP server (Designated Encrypted Relay for Packets) - While not strictly necessary. Let’s build one anyway.
- Exit points running Tailscale
Here’s a diagram of what’s going to be built.
Installation
Let’s start by installing some applications on our Headscale server. We’ll use Nginx to act as a reverse proxy so that we can host both the Headscale and DERP server components on a single server.
 1apt update && apt upgrade -y
 2apt install nginx certbot python3-certbot-nginx
 3
 4# Install the Tailscale client
 5curl -fsSL https://pkgs.tailscale.com/stable/ubuntu/focal.gpg | apt-key add -
 6curl -fsSL https://pkgs.tailscale.com/stable/ubuntu/focal.list | tee /etc/apt/sources.list.d/tailscale.list
 7apt-get update
 8apt-get install tailscale
 9
10# Install Headscale
11wget --output-document=/usr/local/bin/headscale https://github.com/juanfont/headscale/releases/download/v0.14.0/headscale_0.14.0_linux_amd64
12chmod +x /usr/local/bin/headscale
13
14mkdir -p /etc/headscale
15mkdir -p /var/lib/headscale
16
17touch /var/lib/headscale/db.sqlite
18useradd headscale
19chown -R headscale:headscale /var/lib/headscale/
Configuration
Now we need to configure the Headscale server. I won’t go into much detail on what I’m doing here, you can have a look at the project documentation if you need more information.
 1cat << EOF >> /etc/headscale/config.yaml
 2---
 3server_url: http://127.0.0.1:8080
 4listen_addr: 0.0.0.0:8080
 5grpc_listen_addr: 0.0.0.0:50443
 6grpc_allow_insecure: false
 7private_key_path: /var/lib/headscale/private.key
 8ip_prefixes:
 9  - fd7a:115c:a1e0::/48
10  - 100.64.0.0/10
11derp:
12  urls:
13    - https://controlplane.tailscale.com/derpmap/default
14  paths: []
15  auto_update_enabled: true
16  update_frequency: 24h
17disable_check_updates: false
18ephemeral_node_inactivity_timeout: 30m
19db_type: sqlite3
20db_path: /var/lib/headscale/db.sqlite
21acme_url: https://acme-v02.api.letsencrypt.org/directory
22acme_email: ""
23tls_letsencrypt_hostname: ""
24tls_client_auth_mode: relaxed
25tls_letsencrypt_cache_dir: /etc/letsencrypt/live/headscale.example.com/
26tls_letsencrypt_challenge_type: HTTP-01
27tls_letsencrypt_listen: ":http"
28tls_cert_path: ""
29tls_key_path: ""
30log_level: info
31acl_policy_path: "/etc/headscale/acl.hujson"
32dns_config:
33  nameservers:
34    - 1.1.1.1
35  domains: []
36  magic_dns: true
37  base_domain: example.com
38unix_socket: /var/run/headscale/headscale.sock
39unix_socket_permission: "0770"
40EOF
We can use systemd to manage Headscale as a daemon.
 1cat << EOF >> /etc/systemd/system/headscale.service
 2[Unit]
 3Description=headscale controller
 4After=syslog.target
 5After=network.target
 6
 7[Service]
 8Type=simple
 9User=headscale
10Group=headscale
11ExecStart=/usr/local/bin/headscale serve
12Restart=always
13RestartSec=5
14
15# Optional security enhancements
16NoNewPrivileges=yes
17PrivateTmp=yes
18ProtectSystem=strict
19ProtectHome=yes
20ReadWritePaths=/var/lib/headscale /var/run/headscale
21AmbientCapabilities=CAP_NET_BIND_SERVICE
22RuntimeDirectory=headscale
23
24[Install]
25WantedBy=multi-user.target
26EOF
An ACL can be set up for who has access to what. We can treat namespaces as a user account. The admin account would be able to use SSH on all of the nodes, and the user account will access anything from any server with the tag prod-exit, as well as be able to browse anywhere using HTTP/S and DNS.
 1cat << EOF >> /etc/headscale/acl.hujson
 2{
 3  "groups": {
 4    "group:admin": ["admin1"],
 5    "group:user": ["user1"]
 6  },
 7  "tagOwners": {
 8    "tag:prod-controller": ["group:admin"],
 9    "tag:prod-exit": ["group:admin", "group:user"]
10  },
11  "acls": [
12    {
13      "action": "accept",
14      "users": ["group:admin"],
15      "ports": [
16        "tag:prod-controller:22",
17        "tag:prod-exit:22"
18        ]
19    },
20    {
21      "action": "accept",
22      "users": ["group:user"],
23      "ports": [
24        "tag:prod-exit:*",
25        "*:80,443,53"
26      ]
27    }
28  ],
29  "derpMap": {
30    "OmitDefaultRegions": true,
31    "Regions": { "900": {
32      "RegionID": 900,
33      "RegionCode": "myderp",
34      "Nodes": [{
35          "Name": "1",
36          "RegionID": 900,
37          "HostName": "derp.example.com"
38      }]
39    }}
40  }
41}
42EOF
DERP Installation & Configuration
To install our DERP server, we need to use GOLANG to build it.
1wget https://go.dev/dl/go1.17.7.linux-amd64.tar.gz
2rm -rf /usr/local/go && tar -C /usr/local -xzf go1.17.7.linux-amd64.tar.gz
3echo 'export PATH=$PATH:/usr/local/go/bin' | tee /etc/profile.d/go.sh
4go install tailscale.com/cmd/derper@main
5mv go/bin/derper /usr/local/bin/
Again we can use systemd to run it as a daemon using a shell script.
 1cat << EOF >> /etc/systemd/system/derper.service
 2[Unit]
 3Description=derper
 4After=syslog.target
 5After=network.target
 6
 7[Service]
 8Type=forking
 9ExecStart=/usr/local/bin/derper_start.sh
10ExecStop=/usr/local/bin/derper_stop.sh
11
12[Install]
13WantedBy=multi-user.target
14EOF
15
16cat << EOF >> /usr/local/bin/derper_start.sh
17#!/bin/bash
18# Start the derper service
19nohup /usr/local/bin/derper -a :8081 -http-port -1 -stun --verify-clients &
20echo $! > /var/run/derper.pid
21EOF
22chmod +x /usr/local/bin/derper_start.sh
23
24cat << EOF >> /usr/local/bin/derper_stop.sh
25#!/bin/bash
26# Stop the derper service
27kill `cat /var/run/derper.pid`
28rm -rf /var/run/derper.pid
29EOF
30chmod +x /usr/local/bin/derper_stop.sh
NGINX Configuration
Now we can set up NGINX to act as a reverse proxy to our DERP and Headscale daemons.
 1cat << EOF >> /etc/nginx/sites-available/headscale.example.com.conf
 2server {
 3    server_name headscale.example.com;
 4
 5    client_body_timeout 5m;
 6    client_header_timeout 5m;
 7
 8    access_log            /var/log/nginx/headscale.example.com.access.log;
 9    error_log            /var/log/nginx/headscale.example.com.error.log info;
10
11    # reverse proxy
12    location / {
13         proxy_pass http://127.0.0.1:8080;  # headscale listen_addr
14         proxy_read_timeout 6m;
15         proxy_ignore_client_abort off;
16         proxy_request_buffering off;
17         proxy_buffering off;
18         proxy_no_cache "always";
19         proxy_set_header Host $host;
20         proxy_set_header X-Real-IP $remote_addr;
21         proxy_set_header X-Forwarded-For $proxy_add_x_forwarded_for;
22    }
23}
24EOF
25
26cat << EOF >> /etc/nginx/sites-available/derp.example.com.conf
27server {
28    server_name derp.example.com;
29
30    client_body_timeout 5m;
31    client_header_timeout 5m;
32
33    access_log            /var/log/nginx/derp.example.com.access.log;
34    error_log            /var/log/nginx/derp.example.com.error.log info;
35
36    # reverse proxy
37    location / {
38         proxy_pass http://127.0.0.1:8081;  # derp listen_addr
39         proxy_read_timeout 6m;
40         proxy_ignore_client_abort off;
41         proxy_request_buffering off;
42         proxy_buffering off;
43         proxy_no_cache "always";
44         proxy_set_header Host $host;
45         proxy_set_header X-Real-IP $remote_addr;
46         proxy_set_header X-Forwarded-For $proxy_add_x_forwarded_for;
47    }
48}
49EOF
50
51ln -s /etc/nginx/sites-available/headscale.example.com.conf /etc/nginx/sites-enabled/headscale.example.com.conf
52ln -s /etc/nginx/sites-available/derp.example.com.conf /etc/nginx/sites-enabled/derp.example.com.conf
Certbot makes it easy to register with Let’s Encrypt and generate a TLS certificate for both our DERP and Headscale domains.
1certbot
2# Follow prompts to issue certs and enable https redirection.
Run and configure Headscale
After a daemon-reload we can load and enable the services we’ve set up.
1systemctl daemon-reload
2systemctl enable nginx --now
3systemctl enable headscale --now
4systemctl enable derper --now
Our namespaces we referenced earlier in our ACL need to be created.
1headscale namespaces create admin1
2headscale namespaces create user1
Generate a preauth key for each our namespaces to use to authenticate when we register clients in the Tailnet. By default these will expire after 1 hour.
1headscale --namespace admin1 preauthkeys create --reusable --expiration 24h
2#AAAAAAAAAAAAAAAAAAAAAAAAAAAAAAAAAAAAAAAAAAAAAAAA
3
4headscale --namespace user1 preauthkeys create --reusable --expiration 24h
5#BBBBBBBBBBBBBBBBBBBBBBBBBBBBBBBBBBBBBBBBBBBBBBBB
Finally we can start adding some nodes. We’ll start with the Headscale server itself as it will need to be a member in order to verify the DERP clients.
1tailscale up --login-server https://headscale.example.com --authkey AAAAAAAAAAAAAAAAAAAAAAAAAAAAAAAAAAAAAAAAAAAAAAAA --advertise-tags 'tag:prod-controller'
Adding exit nodes
Once we’ve got a working Headscale server we can build our exit nodes and add them to the Tailnet. We’ll need to install Tailscale similar to what we did previously. IP forwarding also needs to be enabled for the host to act as a router and forward traffic.
1echo 'net.ipv4.ip_forward = 1' | tee -a /etc/sysctl.conf
2echo 'net.ipv6.conf.all.forwarding = 1' | tee -a /etc/sysctl.conf
3sysctl -p /etc/sysctl.conf
4
5tailscale up --login-server https://headscale.example.com --authkey AAAAAAAAAAAAAAAAAAAAAAAAAAAAAAAAAAAAAAAAAAAAAAAA --advertise-tags 'tag:prod-exit' --advertise-routes '0.0.0.0/0,::/0' --advertise-exit-node=true
The node then needs to be authorised to be able to advertise itself as an exit as well as advertise its’ routes. We first identify the node’s ID number.
1headscale nodes list
2
3headscale routes enable --identifier 2 --route '0.0.0.0/0,::/0'
Client Setup
Now that we’ve got an exit node, we can configure a client connect to the Tailnet. After installing the Windows package, we set two registry keys to use our custom Headscale server.
1HKLM:\SOFTWARE\Tailscale IPN\UnattendedMode=always
2HKLM:\SOFTWARE\Tailscale IPN\LoginURL=https://headscale.example.com
After loading up tailscale, it will prompt to login which will then load a webpage. Because we’re using Headscale behind a proxy the URL will be incorrect and set to the localhost 127.0.0.1:8080. Change the first part of this to your headscale URL and you’ll get instructions on how to enrol the client. This will include a generated client key.
1headscale -n user1 nodes register --key CCCCCCCCCCCCCCCCCCCCCCCCCCCCCCCCCCCCCCCCCCCCCCCC
Back in the windows client if we select our exit node, we can then start routing all traffic through it. Confirm that you’re showing a different IP and country from your client machine.
1curl ifconfig.io
2curl ifconfig.io/country_code
If this were a Linux client, we’d simply enrol the client in the Tailnet similar to before then re-run the Tailscale client and use the --exit-node option.
1tailscale status
2tailscale up --exit-node=<exit node IP>
Conclusion
Adding more exits is now trivial as we simply just create an auth key, enable forwarding and enrol the node in the Tailnet. We don’t even need to have a node that’s exposed to the Internet as long as it can reach the Headscale server. In my example I used Azure with peered vnet between different regions. I then just used the Headscale server as a bastion host to configure the exit server. However if you built a custom image or used an cloud init script you could build the exit node anywhere.
 1#cloud-config
 2runcmd:
 3  - 'echo "net.ipv4.ip_forward = 1" | tee -a /etc/sysctl.conf'
 4  - 'echo "net.ipv6.conf.all.forwarding = 1" | tee -a /etc/sysctl.conf'
 5  - 'sysctl -p /etc/sysctl.conf'
 6  - 'curl -fsSL https://pkgs.tailscale.com/stable/ubuntu/focal.gpg | apt-key add -'
 7  - 'curl -fsSL https://pkgs.tailscale.com/stable/ubuntu/focal.list | tee /etc/apt/sources.list.d/tailscale.list'
 8  - 'apt-get update'
 9  - 'apt-get install tailscale -y'
10  - 'tailscale up --login-server https://headscale.example.com --authkey AAAAAAAAAAAAAAAAAAAAAAAAAAAAAAAAAAAAAAAAAAAAAAA --advertise-tags "tag:prod-exit" --advertise-routes "0.0.0.0/0,::/0" --advertise-exit-node=true'
Further work could be done to integrate Headscale with an authentication provider such as LDAP along with some fine tuned ACLs.